
You can create useful garden shelter with these insect house DIY ideas, from roofed wooden bee houses to cool, ground-level refuges made with reclaimed bricks and branches. The mosy useful project will match the insects you want to support: sunny, dry cavities for nesting solitary bees, or shaded, damp crevices for ground-dwelling wildlife.
You’ll give any design a stronger foundation with untreated materials, secure construction, and nearby plants that attract beneficial insects.
Keep pesticides away from your habitat area, and leave some natural leaf litter nearby. A small, manageable shelter gives you an easier introduction than a large structure with crowded, hard-to-maintain nesting spaces.
1) Wooden Frame with Mixed Material Shelving
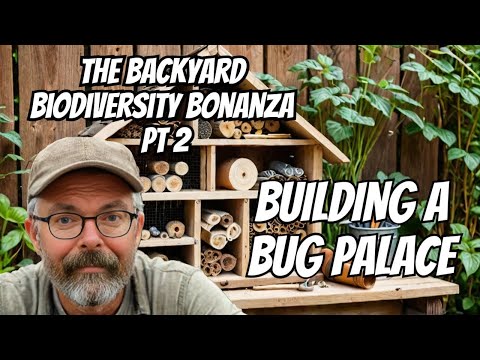
With a divided wooden frame, you get clearly separated spaces for dry nesting cavities and loose natural shelter. You also gain easy access for checking individual compartments, which makes this a practical beginner project.
For your bee compartment, choose smooth, closed-end cavities roughly 3/32 to 3/8 inch wide and 4 to 6 inches deep, with dimensions suited to local species. Your overhanging roof should keep the entrances dry.
You’ll have easier upkeep with removable nesting inserts. Replace used liners after emergence, and clean reusable components between nesting seasons. Leave occupied cavities undisturbed until their residents have emerged.
2) Stacked Red Brick Insect Hotel
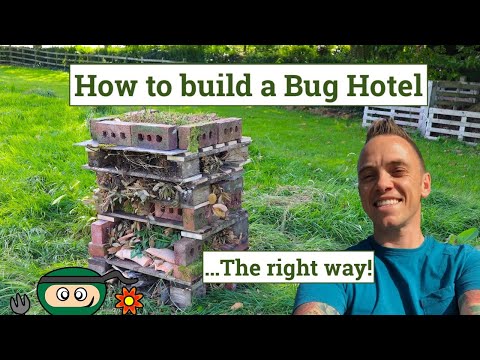
Reclaimed red bricks give you a durable, low-cost refuge with sheltered gaps close to the soil. You’ll get the most habitat value from this design in a cool, partly shaded corner, where ground beetles and other small creatures find cover.
Your brick openings serve as general hiding places; their rough, open-ended holes aren’t suitable substitutes for purpose-made bee cavities. Bark and weathered wood nearby give you additional textures without expensive supplies.
Keep your stack low and secure on firm, level ground. Position it away from tender seedlings if you want to limit nearby slug shelter.
3) Stacked Pallet Hotel with Eco Moss Roof

A low pallet stack gives you generous habitat space when you have a larger garden and plenty of clean, reclaimed material. Among the many garden uses for pallets, this project makes good use of the gaps already built into the structure.
Choose sound, untreated wood with a known history; an “HT” stamp indicates heat treatment, but you still need to check for spills or contamination.
Your moss roof suits a shaded refuge, provided its wet weight has proper support. A waterproof separation beneath the planting layer protects the timber. Keep your stack below about 3 feet and secure against shifting.
4) Hanging Wooden Bug Hotel with Slopped Roof
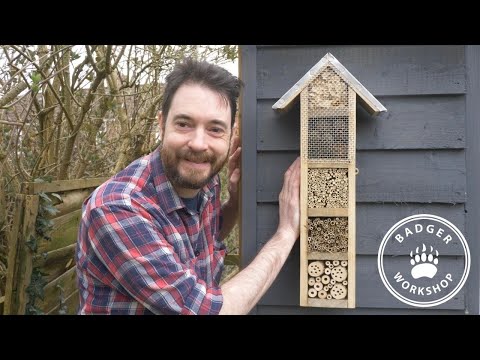
For a compact, weather-protected shelter, you get plenty of value from a wooden house with a sloping roof. Its overhang helps protect nesting entrances from driving rain, while the small footprint suits a fence or shed wall.
Despite the hanging style, your bee shelter needs a firm mounting that prevents swinging. Morning sun and protection from strong wind make a useful combination for dry nesting compartments.
You can work the roof shape into your DIY garden landscaping ideas without sacrificing function. Keep any exterior finish away from cavity interiors, and leave enough access to inspect the nesting inserts.
5) Stick and Twig DIY Insect Hotel
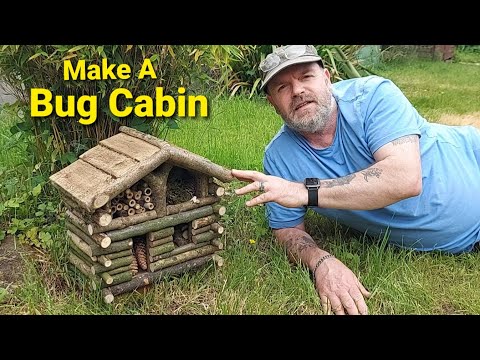
Your ordinary garden prunings become useful shelter in a stick-and-twig hotel, making this an especially affordable nature project. You get irregular crevices for small invertebrates while keeping some garden debris out of the waste bin.
Solid twigs offer hiding places, while suitable hollow stems provide a different habitat: potential nesting cavities. For a general twig refuge, a sheltered position near shrubs keeps the material connected to existing cover.
You’ll find this design easy to refresh as exposed material weathers. Keep bundles secure, and check for occupied stems before removing any filling.
6) Hanging Mini Hotels Connected with Chains

Linked mini hotels let you enjoy several small habitat compartments where you have limited wall space. You also gain a manageable way to inspect separate fillings without handling one bulky structure.
Your main practical consideration is movement. Chains create an appealing hanging arrangement, but a swinging bee nest creates unnecessary disturbance. Secure each module against a firm backing if you include nesting cavities.
Keep your chain connections strong enough for rain-soaked wood, and position the lowest unit beyond accidental knocks. For a family project, the separate boxes give you room for different natural textures while keeping each compartment easy to observe.
7) Budget Parcel Tube Bug Hotel

A parcel tube gives you an inexpensive, temporary housing for a small bundle of suitable nesting stems. You’ll get the most use from it beneath a deep porch roof or inside another reliably rain-protected space.
Cardboard softens when damp, so your outer tube needs regular checks for mold and damage. It serves as a holder, with the enclosed stems providing the actual shelter.
This project suits your first experiments with recycled materials because the container costs little and takes up minimal space. Keep the tube firmly supported, and avoid moving or replacing occupied stems during nesting and development.
8) Eco-Friendly Garden Scrap Insect Hotel

By keeping selected garden scraps in a sheltered corner, you create a refuge that resembles the loose cover already found beneath shrubs. Weathered branches and bark give you a useful starting point without purchased nesting supplies.
Your shaded ground-level version suits moisture-loving decomposers and their predators. Keep any dry nesting stems in a separate, sunny shelter so you can maintain the conditions each habitat needs.
Nearby plants that attract lacewings add feeding opportunities around your refuge. Use healthy plant material, and leave diseased stems or pesticide-treated cuttings out of the project.
9) Tin Can Insect Hotel

An empty food can offers you a compact outer casing for replaceable nesting stems, especially where space and budget are tight. Its small size also keeps your maintenance commitment manageable.
Your safety checks deserve attention: the rim needs to be completely smooth or securely covered, and the interior should be clean and dry. Metal heats quickly in strong sun, so choose a position with morning light and protection from intense afternoon heat.
Mount your can horizontally and firmly beneath weather cover. Keep its opening clear of pooled water, with the stem entrances protected inside the front edge.
10) Drilled Out Wooden Cubes Bug Hotel

Solid wooden cubes give you a tidy way to display nesting holes and watch for sealed entrances during the active season. You’ll get a clearer view of bee activity than you would through loosely packed decorative filling.
The main trade-off is maintenance. Permanent drilled holes are difficult to clean thoroughly, so your most practical version uses removable blocks or replaceable liners that fit suitable cavities.
Choose seasoned, untreated wood with smooth entrances and closed backs. Give your cubes roof protection, and plan how you’ll retire worn blocks after all occupants emerge. Keep the blocks accessible enough for close inspection without moving the shelter.
11) Kid-Friendly Pinecone & Twig Hanging Hotel

For a family craft, you get plenty of hands-on interest from sorting pinecones and twigs into a small shelter. Different textures invite close observation, and your youngest helpers can participate while an adult handles sharp tools and secure mounting.
Treat your finished project as an exploratory refuge. Pinecones provide gaps, but you shouldn’t expect them to function like properly sized bee-nesting tubes or reliably attract ladybugs.
Alongside other spring garden ideas for kids, this project gives you an ongoing observation activity. Keep the filling loosely structured and sheltered, and watch entrances without poking inside or disturbing residents.
12) Old Terracotta Pot Insect Hotels

Spare terracotta pots give you sturdy, reusable covers for small refuges at ground level. Your sheltered pot creates a shaded space beside established planting, with room for bark or a few pieces of weathered wood.
This design suits your garden’s cooler habitat area. A pot exposed to strong sun heats up and dries quickly, so a shaded position offers more useful conditions for moisture-loving residents.
Keep your pot stable and its entrance accessible. If you use a chipped pot, position sharp edges safely out of reach. Check around nearby seedlings for slug damage as part of your usual garden rounds.
13) Lady-Bug Themed Tin Can Bug Hotel

A ladybug-themed can gives you a cheerful family painting project with space for a modest insect refuge inside. You can enjoy the decorative theme while keeping your expectations grounded: red paint and black spots don’t determine which insects move in.
Your surrounding planting provides a stronger reason for ladybugs to visit. With plants that attract ladybugs, you provide feeding opportunities near the shelter, including pollen or habitat for aphid prey.
Keep paint on the exterior and allow it to cure fully. A sheltered location protects the filling, while safe edges make the finished project easier for children to observe.
14) Full Bug Hotel Fence (Big Project)
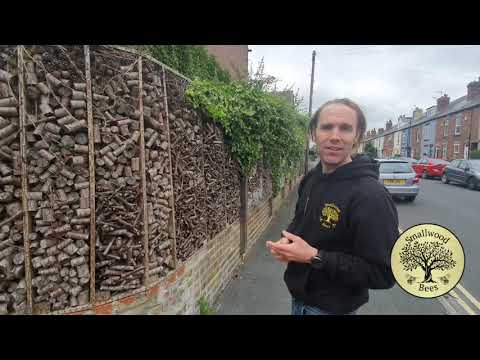
Along a garden boundary, you have room for a series of habitat modules with different exposure and moisture levels. You’ll get greater practical value from accessible compartments that you can inspect individually than from densely packed filling hidden deep inside a structure.
Your sunny upper modules suit protected bee nests, while shaded lower spaces accommodate bark and decaying wood. Keep soil and wet material away from structural fence timbers, and have heavy sections independently supported.
Allow maintenance access along the fence. Position any DIY bird feeders away from nesting entrances to reduce concentrated bird activity, and keep replacement habitat modules small enough to handle safely.