
If you’re working with a smaller budget, these 10 DIY cold frame ideas give you ways to reuse windows, leftover lumber, or a clear storage bin!
You’ll get the most benefit from a sunny, well-drained location with the lower front facing south in the Northern Hemisphere. Your cool-season crops gain shelter from wind and precipitation, although an unheated enclosure still freezes during sufficiently cold weather. Spinach, kale, and other vegetables suited to winter gardening give you a more realistic starting point than heat-loving crops.
Plan for ventilation from the outset. Even on chilly days, sunshine heats a closed frame quickly, so you’ll need a secure way to hold it open and a thermometer at plant height. Your local weather and daylight hours will determine how far you extend the season.
1) Rigid Plastic Slopped Roof Cedar Frame

You get a long-lasting, low-maintenance project when you pair a cedar base with a rigid polycarbonate roof. The wood’s natural decay resistance is useful around damp soil, while the clear roof gives you a lighter lid than a comparably sized glass window.
A sloping top helps rain run off and gives your plants extra headroom toward the back. With twin-wall polycarbonate, you also gain an insulating air space between the panel’s layers. You’ll still need to clear accumulated snow before its weight strains the roof.
This build gives you room for satisfying finishing details, including comfortable handles and a dependable lid stay. Corrosion-resistant hardware suits the damp environment inside. If you want less daily adjustment, a compatible temperature-activated vent opener gives you a useful upgrade, provided its lifting capacity matches your lid.
2) Budget Mobile Cold Frame from Window Well Covers

With a clear window well cover, you get a ready-shaped shelter that keeps the carpentry modest. Its molded curve gives seedlings headroom without requiring you to construct a separate roof frame.
You’ll find this idea especially useful for moving protection between short rows or small groups of pots. A lightweight base gives the cover a defined footprint and makes the whole enclosure easier to relocate when you rotate crops.
Your main trade-off is wind resistance. Secure attachment points and ground anchors deserve attention because a broad plastic cover catches gusts readily. You’ll also want a cover that admits plenty of light and is intended for outdoor exposure.
Keep your expectations matched to its strength: a window well cover needs protection from heavy snow loads. For seasonal use, its manageable weight makes storage and repositioning appealing.
3) Cold Frame with Lid from Old Windows

Repurposed windows give you a rewarding salvage project, especially when several smaller sashes become independently opening lids. You gain access to one part of your planting area while keeping the rest sheltered.
Your available windows determine the footprint, which takes some of the design guesswork out of the project. Matching sashes create a tidy row; slightly different sizes give you scope for a more individual layout.
Before committing to a window, check its condition carefully. You’ll need sound joints and intact glazing, with no sharp edges or cracked panes. Older painted frames deserve particular caution because their coatings might contain lead; avoid sanding or scraping paint of unknown composition around your growing area.
For heavy glass lids, your hardware needs enough strength to support the full weight. A positive-locking lid stay gives you safer access during harvesting.
4) Mini Wooden Cold Frame with Shelving

For a small patio, you gain organized growing space from a compact wooden enclosure with removable shelving. You’ll have room for seed trays above and shorter pots below, all within a modest footprint.
The enjoyable part is tailoring the interior to your containers. Adjustable shelf positions accommodate different pot heights, while slatted shelves let excess irrigation water drain through. A removable lower shelf leaves you more flexibility when seedlings grow taller.
You’ll need to watch how the shelves affect sunlight. Dense trays overhead shade plants underneath, so a shallow layout and generous spacing suit this design. Rotating trays helps you distribute exposure.
If your spring vegetable garden begins with indoor-grown transplants, this gives you a useful intermediate space for hardening them off. Tender seedlings still need protection or an indoor return when temperatures fall below their tolerance.
5) Wood Cold Frame from Old Pallets
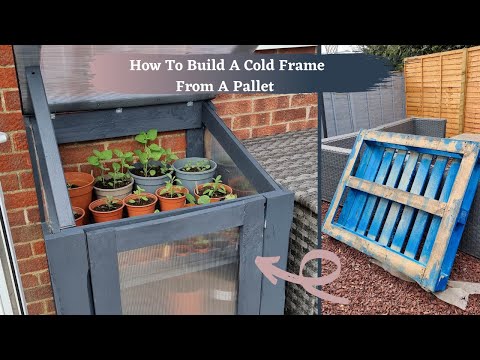
Reclaimed pallet boards let you turn discarded material into a useful garden structure while keeping your lumber purchases down. You also get the satisfaction of giving weathered timber a defined purpose.
Among the many garden uses for pallets, a cold frame rewards careful material selection. Choose clean wood with a known history. An HT stamp indicates heat treatment, but it tells you nothing about later spills or contamination. Reject MB-marked pallets and any boards with chemical odors, oily patches, or unknown treatments.
Your finished frame’s usefulness rests on the condition of those boards. Sound pieces hold hardware securely; warped slats leave drafts and make lids harder to fit.
Expect more preparation than you would with new lumber. Removing embedded nails and smoothing rough edges takes time, so this project suits you if reclaiming the wood is part of the enjoyment.
6) Plastic Storage Bin Seed Starting Cold Frame

A clear storage bin gives you a no-carpentry option for sheltering a few seed trays or small pots. You get an inexpensive way to experiment with a protected growing space before committing to a larger structure.
This version is especially handy for cool-season seedlings that tolerate outdoor temperatures. For warm-season crops such as peppers, you’ll still need suitable germination warmth; a sunlit bin loses heat after dark.
Your container needs drainage so runoff never leaves pots standing in water. Clear sides and a light-transmitting lid give seedlings better exposure, while generous ventilation limits overheating and persistent condensation.
Portability is a useful benefit, although a loaded bin becomes awkward to carry. You’ll also want to watch for brittle plastic as sunlight ages it. Household storage bins suit temporary seasonal use better than permanent outdoor service.
7) Scrap Wood Cold Frame

Leftover lumber gives you freedom to design a cold frame around an awkward garden space or an existing piece of glazing. You’ll get more value from usable offcuts while keeping the finished size appropriate for your plants.
Unlike a project tied to matching boards, this approach lets you combine different widths within a reinforced structure. Your collection of materials becomes a practical design puzzle, especially if you already have spare hinges or handles.
Keep the wood’s history in mind. Clean, sound offcuts are useful; railroad ties, creosote-treated timber, and lumber with unknown coatings belong outside your food-growing project.
You’ll get a sturdier result when your lid hardware has substantial wood behind it. Short corner supports also help keep the box square when you lift it between beds. For a movable frame, manageable dimensions make seasonal storage less cumbersome.
8) Easy Shallow Cold Frame with Lid

Low-growing salad crops fit comfortably beneath a shallow cold frame, giving you protection without a bulky garden structure. Your lettuce, spinach, and young arugula remain easy to reach through a low front edge.
You’ll appreciate this compact design if you want something easy to lift off a bed when spring weather settles. Its modest profile also takes up less storage space than a tall enclosure.
The limited headroom gives you a clear planting brief. Baby-leaf harvests suit it well, while tall kale and large pots need a deeper design. Leave space between foliage and the glazing so wet leaves stay clear of the cold surface.
A lightweight lid makes frequent harvesting convenient, provided you have a secure hold-open support. If you use flexible plastic glazing, a taut, sloped surface helps prevent rainwater from pooling over your plants.
9) Wooden Cold Frame with Old Glass Window

An intact single window gives you a defined lid for a fixed wooden frame over one compact bed. You get a straightforward salvage project with fewer moving sections than a multi-window enclosure.
This design is useful when you want dependable access to a dedicated patch of overwintering greens. Your frame’s dimensions follow the sash, so checking that you can reach every corner comfortably is worthwhile before settling on its position.
Glass keeps its clarity well, but its weight calls for substantial hinges and a restrained opening angle. A safety chain limits backward travel, while a locking support holds the lid during tending. You’ll need a separate latch to keep it closed in wind.
Choose your sash with the same care you give your growing site: intact panes, sound wood, and safely managed paint. Where children or pets play nearby, lightweight polycarbonate glazing offers a lower-breakage alternative.
10) Removeable Hoop House Cold Frame

Flexible hoops and clear greenhouse film give you a removable low tunnel with more growing height than a shallow box. You gain room for leafy crops while keeping the covering light enough for seasonal removal.
This project suits a long raised bed particularly well. You’ll have fewer rigid panels to store, and the curved roof sheds rain when the film stays taut. UV-stabilized greenhouse film is better suited to extended sun exposure than an indoor plastic drop cloth.
Your access arrangement deserves as much thought as the hoops. A roll-up side or lift-off section makes harvesting manageable without disturbing the entire cover.
Wind anchoring is especially important with this broad, lightweight surface. Secure film edges and firmly held hoops help prevent flapping and tearing. Before heavy snow, clear accumulation promptly and remove the covering if your supports cannot safely carry the expected load.